
There’s something magical about a warm plate of nachos. The moment that cheesy aroma hits the air, your taste buds wake up, and suddenly everyone wants to gather around. If it’s for movie night, game day, or a casual weekend snack, nachos always bring a little happiness to the table.
Making nachos at home is one of the easiest and most satisfying things you can do in your kitchen. You don’t need fancy equipment, and you don’t have to be a chef. In fact, once you learn how to layer, season, and melt everything perfectly, you might never order nachos from a restaurant again.
This detailed guide will walk you through everything you need to know — from choosing the best chips to creating irresistible toppings and even trying fun variations like chicken, vegetarian, spicy, and fully loaded versions.
So grab a snack (you might get hungry reading this), and let’s dive into the world of homemade nachos done right.
Why Make Nachos at Home?
Nachos are comfort food at its finest. They’re crispy, cheesy, customizable, and crowd-pleasing. But when you make them yourself, they get even better for a few reasons:
You control the ingredients. No more greasy, soggy chips or bland cheese sauce, you decide what goes in.
They’re quick. In about 15 to 20 minutes, you can have hot, golden, melty nachos ready to serve.
They fit every mood. Light snack? Simple cheese and jalapeños. Full meal? Add seasoned beef, beans, and guacamole.
They’re budget-friendly. A family-sized tray costs far less than eating out.
They bring people together. Nachos are made to share; they’re the ultimate social food.
Understanding the Basics: What Makes Nachos Perfect?
Perfect nachos strike a balance between crunch, flavor, and freshness. That means every layer, from the chips to the toppings, plays a role.
Crunch: Chips should be sturdy enough to hold toppings without breaking.
Flavor: Seasoned meat, melted cheese, and the right spices make all the difference.
Freshness: Cold toppings like salsa, sour cream, and guacamole add brightness and contrast to the warm base.
Think of nachos as a team; every ingredient supports the others to create something incredible.
Step 1: Choosing the Right Tortilla Chips
Not all chips are created equal. The base is everything, so go for thick, restaurant-style tortilla chips. They’re sturdy and hold up under cheese and toppings without turning soggy.
Avoid:
- Thin or airy chips (they’ll break easily).
- Flavored chips (they clash with your toppings).
- Stale chips (you’ll lose the crunch completely).
If you want to go the extra mile, make your own chips:
- Cut corn tortillas into triangles.
- Brush lightly with oil.
- Bake at 375°F (190°C) for 10–12 minutes until golden and crispy.
- Homemade chips add a fresh corn flavor and stay crunchy longer.
Step 2: The Cheese — The Heart of Every Nacho Plate
Cheese is where nachos come alive. You want a cheese that melts beautifully and stretches when you lift a chip.
Best Cheeses for Nachos
Cheddar: Classic flavor and great melt.
Monterey Jack: Smooth, creamy, and mild.
Colby Jack: A perfect blend of cheddar and Monterey.
Mozzarella: Adds an extra stretchy melt (use with cheddar for balance).
Avoid pre-shredded cheese if you can; it has anti-caking agents that stop it from melting smoothly. Shred your cheese fresh for the best results.
For extra richness, make a cheese sauce by melting cheese with a bit of milk or cream on the stove. This gives every chip a silky coating instead of uneven melted blobs.
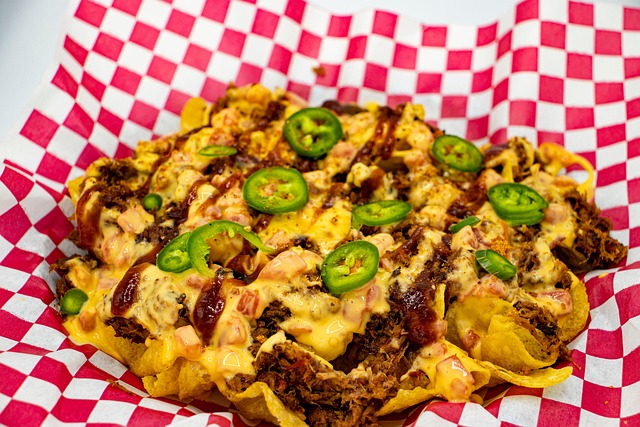
Step 3: The Classic Cheesy Beef Nachos
Let’s start with the timeless version, cheesy beef nachos. This is the kind you’ll find in every good Mexican restaurant, except now you’ll make it even better at home.
Ingredients:
- 1 bag of thick tortilla chips
- 1 lb (450g) ground beef
- 1 small onion, diced
- 1 clove garlic, minced
- 1 tsp chili powder
- ½ tsp paprika
- ½ tsp cumin
- Salt and black pepper to taste
- 2 cups shredded cheddar or Monterey Jack cheese
- 1 cup refried beans or black beans (optional)
- Jalapeño slices
- Salsa, sour cream, and guacamole for serving
Instructions:
Cook the beef: Heat a pan over medium heat. Add the ground beef, onion, and garlic. Cook until the meat browns, breaking it apart as it cooks.
Season: Drain excess oil, then stir in chili powder, cumin, paprika, salt, and pepper. Mix well and cook for another minute to bring out the flavor.
Prepare your tray: Preheat your oven to 375°F (190°C). Line a baking tray with parchment paper or foil.
Layer the nachos: Spread a layer of chips on the tray. Add half the cheese, half the beef, and a few beans. Repeat with another layer.
Bake: Place in the oven for about 10 minutes, or until the cheese melts completely.
Top it off: Add jalapeños, a drizzle of salsa, and dollops of sour cream and guacamole just before serving. Every bite should be a perfect balance of crunch, spice, and creamy cheese, the definition of comfort.
Step 4: Chicken Nachos — A Fresh and Flavorful Twist
If you prefer something lighter, chicken nachos are a great alternative. They’re bright, flavorful, and perfect with a squeeze of lime.
Ingredients:
- 1 cup cooked shredded chicken (rotisserie works great)
- 1 tbsp olive oil
- 1 tsp taco seasoning or paprika
- Tortilla chips
- 2 cups shredded cheese
- Chopped red bell peppers
- Sweet corn kernels
- Diced tomatoes
- Jalapeños
- Fresh cilantro
Instructions:
- Toss the chicken in olive oil and taco seasoning.
- Spread chips on a tray, then layer with chicken, cheese, corn, and peppers.
- Bake until the cheese melts and the edges start to brown slightly.
- Garnish with diced tomatoes and cilantro before serving.
- You can also drizzle sour cream or ranch dressing over the top for a creamy finish.
Step 5: Vegetarian Nachos — Full of Color and Flavor
Who says nachos need meat to taste good? Vegetarian nachos are vibrant, healthy, and every bit as satisfying.
Ingredients:
- Tortilla chips
- 1 can of black beans or kidney beans, drained
- 1 cup corn kernels
- ½ cup diced tomatoes
- ½ cup diced red onion
- 1 avocado, diced
- 2 cups shredded cheese
- 1 tsp chili powder
- Lime wedges for garnish
Instructions:
Mix beans with chili powder for flavor.
Layer chips, beans, corn, and cheese.
Bake until cheese melts.
Add tomatoes, avocado, and onion after baking for freshness.
The mix of warm beans and cool avocado makes this version light but filling.
Step 6: Spicy Nachos; For Those Who Like It Hot
Turn up the heat. If you love bold, fiery flavors, spicy nachos will be your favorite.
How to Make Them:
- Use spicy cheese (like pepper jack).
- Add fresh or pickled jalapeños.
- Mix in a spoonful of hot sauce with your beef or chicken.
- Sprinkle crushed chili flakes on top before baking.
- You can also serve them with spicy salsa or chipotle mayo on the side for an extra kick.
Step 7: Loaded Nachos; The Ultimate Party Platter
Loaded nachos are the showstopper, everything you love about nachos piled high in one beautiful, cheesy mountain. These are perfect for family nights or when you’re hosting friends.
Ingredients:
- Tortilla chips
- Ground beef or shredded chicken
- Refried beans
- Cheese (lots of it)
- Jalapeños
- Diced tomatoes
- Black olives
- Sour cream
- Guacamole
- Salsa
- Green onions
Instructions:
- Layer chips, cheese, meat, and beans.
- Bake until bubbling.
- Add fresh toppings after baking.
- Serve immediately while hot.
- Every layer should have something going on: creamy, spicy, crunchy, and fresh.
Step 8: Common Nacho Mistakes (and How to Avoid Them)
Even though nachos are easy, a few small mistakes can ruin them.
Overloading with wet toppings: Too much salsa or sour cream makes chips soggy. Always add them after baking.
Using thin chips: They’ll fall apart under toppings.
Uneven layering: Don’t dump everything on top. Layer in sections for balance.
Baking too long: Cheese can dry out if overcooked.
Serving too late: Nachos should be eaten right away while the cheese is still warm and gooey.
Step 9: Tips for Making Nachos Like a Pro
- Use two layers of chips and toppings instead of one big pile. It helps every chip get flavor.
- Add beans or meat first, then cheese. The cheese acts as glue and holds everything together.
- Bake, don’t microwave. Microwaves melt cheese unevenly and make chips soggy. Add fresh toppings last. Anything cold, tomatoes, guacamole, and herbs, should go on after baking.
- Use parchment paper. Makes cleanup super easy.
Step 10: Serving and Presentation Ideas
Presentation matters, especially if you’re sharing photos or serving guests.
Serve nachos on a large ovenproof platter or a cast-iron skillet for that rustic look.
Sprinkle a few fresh herbs (like cilantro or parsley) right before serving.
Offer small bowls of salsa, sour cream, and guacamole on the side so everyone can build their own bite.
Add lime wedges for brightness; a quick squeeze brings the whole dish to life.
Bonus: Dessert Nachos
If you thought nachos were only savory, think again. Dessert nachos are a fun twist that turns a party snack into a sweet treat.
How to Make Dessert Nachos:
Use baked cinnamon-sugar tortilla chips (brush with butter, sprinkle cinnamon sugar, and bake).
Top with melted chocolate, sliced strawberries, bananas, whipped cream, or even ice cream.
It’s the perfect ending to a nacho night.
Storage and Reheating Tips
Nachos taste best fresh, but if you have leftovers, here’s how to save them:
- Store toppings separately if possible.
- Keep chips in an airtight container at room temperature.
- Reheat baked nachos in the oven at 350°F (175°C) for 5–7 minutes.
- Avoid microwaving, as it softens the chips.
Conclusion
Homemade nachos are one of life’s simple joys, crunchy, cheesy, and endlessly customizable. Once you master the basics, you can experiment endlessly with new toppings and flavors.
If you prefer the comfort of classic cheesy beef nachos, the freshness of chicken, the heartiness of vegetarian, or the boldness of spicy and loaded versions, there’s something here for everyone.
The best part? You made them yourself, hot, melty, and straight from your kitchen. Serve them up, share them around, and enjoy the smiles that follow. Because at the end of the day, perfect nachos aren’t just about the ingredients, they’re about the good times that come with them.